Monday, May 12, 2008

Ansel Adams

Ansel Adams is probably the best well-known black and white photographer of his time. He is probably most known for his photographs of the Yosemite Valley and the Sierra Nevada which is a 400 mile long, 10-14000 foot high mountain range which includes the Yosemite, Sequoia, Mt. Rainier, and Glacier National Parks. In the beginning of his career he wavered between music and photography. It wasn’t until viewing the work of Paul Strand that Adams decided on photography. Adams became interested in photography when his Aunt gave him a copy of “In the Heart of the Sierras”. He was able to pursue that interest when his parents took him on a family vacation to Yosemite National Park and gave him a camera as a present.

During his photography career, Adams did a lot of things besides taking photographs. He formed the “f/64” group which was dedicated to the concept of photography that looked like photography. He was sick and tired of people using photography as an imitation of other art forms. He also published a book called the “Yosemite and the Range of Light” and received numerous awards for his achievements.

Ansel Adams is my absolute favorite photographer. I first saw his work in my high school photography class. I was stuck on finding an idea to do my next project about and she handed me a book of his photographs. I immediately was fascinated by all the images. I think what caught my eye the most was the details in the photographs. Adams uses different levels of contrast to emphasis his images. When I look at photographs, I like to see strong contrast in some places because it catches the viewer’s eye and makes them stop and look closer. In Adams photograph’s he does a great job at catching my attention and making my interested in what’s really happening in each of his photographs which is why Ansel Adams is my favorite photographer.


http://www.masters-of-fine-art-photography.com/02/artphotogallery

Jeffrey Conley

Jeffrey Conley is an amazingly talented black and white photographer. Originally from New York, Conley received a Bachelor of Fine Arts degree in Photographic Studies at Rochester Institute of Technology. He currently lives in Oregon’s Willamette Valley where he still creates marvelous black and white prints of a variety of subject matters.

Conley’s subject matter consists of urban landscapes and still-life’s to studies of the wilderness. His works’ consist of everyday objects that, with a little help from his creative techniques, draw people’s attention to those images he creates. He try’s to capture the spirit of the subjects he shoots and send a message of simplicity through his photographs.

Like his subject matters, Conley uses a variety of different types of lighting to emphasis the subjects in his photos. He mostly uses harsh light but there are a few other photos where he uses soft light as well. He uses techniques such as close-ups, far away subjects, motion, shape, contrast, space, line and balance in many of his compositions.

Conley describes in his own words what photography means to him:
“I consider the act of photographing to be a kind of meditation that widens the perception of the existing and evolving the world around us. As a two dimensional manifestation of a brief and fleeting instant, the static photographic image allows for lingering, prolonged contemplation. I seek refuge and simplicity through my photographs and find a personal resolution and fulfillment that I sincerely hope is communicated to others.”- Jeffrey Conley

Each black and white print Conley creates, is delicately made using traditional photographic processes. He uses the technique of dodging and burning to selective areas within his prints. This process makes each print distinctly original but still fits into the style of Jeffrey Conley’s inspirational work. I like Conley’s photographs because he uses simplicity and different types of lighting to illuminate the photographs, which catches my attention.


http://www.anseladams.com/


Michael Kenna

Michael Kenna is an English photographer, who is known for his landscape photography. Kenna has attended Upholland College in Lancashire, the Banbury School of Art in Oxfordshire, and the London College of Printing. His work has been displayed in galleries and museum exhibitions in Asia, Australia, Europe, and the United States. Michael Kenna’s photography focuses on unusual landscapes with ethereal light by photographing at dawn or at night with very long exposures some lasting up to 10 hours. Kenna prefers to use Hasselblad cameras because of their durability and dependability.

I think the reason why I like Kenna’s work is because I am drawn to the same photographical components. He tends to stay away from photographing people or places where there are people. He waits for everyone to leave and then shows the after effects. He tends to photograph in an atmosphere that’s absence; where everything is quite and tranquil. I too enjoy walking around in the silence and just looking around at the surroundings and trying to see what other people overlook. For me finding that one thing brings it out of hiding so that everyone can see. I tend to photograph in places where lots of people walk or drive by and never stop to look at the whole picture. I remember driving down a nearby road and looking through the trees and something caught my eye. I stopped the car and took a walk to check it out. When I got closer, I noticed that it was a fort and then just behind that fort was a stream. I ended up developing those pictures and I remember someone had come up to me and asked where that picture was taken and they took me that they lived right down the road and never knew that anything was there.


http://www.afterimagegallery.com/kenna.htm

Thursday, May 8, 2008

35mm Camera

How to Load a 35mm Camera

I remember walking into my first photography class and freaking out when I realized it wasn't digital cameras I'd be working with but manual cameras. I struggled for days trying to load the film correctly in the camera and got frustrated on many occasions. I couldn't even tell you how many rolls of film I wasted until I finally got the technique down packed. However, now going into my second year as a photography student, I have become a pro at loading film and I'm going to share my secrets with you.

First, you have to pull up on the film rewind knob located on the top, left hand side of the camera when you look at the back of the camera. When you look inside the back of the camera, on the left you will see the film chamber. Place the film inside the chamber with the film strip facing towards the middle of the camera back and push down the film rewind knob. This will lock the film in place so it won't move around.

Next, pull the film strip out only until it reaches the film reel which is the reel farthest to the right in the back of the camera. On the film reel there are thin slots which the film goes into. You want to make sure that the film goes into the farthest visible slot and push the film into the slot just a little bit. It's important to make sure that the film sprockets align correctly because that is what makes the film wind forward. The film sprockets are located on the sprocket reel which is to the left of the film reel. Once the sprockets line up, manually advance the film by turning the film reel so that the film goes around once in a clock-wise motion.


Then, once the film is manually advanced, close the back of the camera and get the film counter to 1. In order to do that you have to advance the film by pushing the shutter release button located on the top, right side of the camera and make sure the film advance lever, also located on the top, right side which looks like an arm, is away from the camera body. If the film advance lever is not away from the camera body, the shutter button can not be clicked. Once the shutter button is clicked you advance the film by turning the film advance lever to the right and release. You do that until the film counter, located in front of the film advance lever reads 1.


http://www.nanites.co.uk/images/Pentax%20History%20Images/SV.jpg

Finally, it is crucial to set the film speed dial otherwise your film will advance but your photographs will come out blurry and not how you hoped they would. On the film box there will be a number which can range from 25-3200 and probably beyond. The higher the number, the faster the film speed but the more grainy the resolution is and the lower the number, the slower the film speed but the less grainy the resolution. If you were to print 8x10 pictures or smaller then you could use a faster film speed because at those sizes you wouldn't be able to notice the grainy resolution. However, if you wanted to print 11x14 pictures or larger then you would want to use a slower film speed because at those size you would see ever grain in the resolution. That number is the film speed and you want to make sure that the film speed on the box matches the film speed on your camera. To set the film speed you have to look on the film speed dial which is on the top, right side near the shutter release button. On the film speed dial there is an outer ring that you have to pinch and lift up in order to turn the dial and read a tiny window located on it which tells you the speed.


Once you have done all of these steps you are ready to take pictures. So, the next time you have to load a manual camera for a photography class or you get tired of taking digital pictures and want to do it old school, like me, and use a 35mm manual camera you won't have to spend days trying to load the film, you'll be one step again of the game and your pictures will come out just as you planned.

Saturday, March 29, 2008

Panoramic Cameras

Panoramic Cameras allow the photographer to create images with a wide field of view. The capable field of view of a panoramic camera can be compared to that of the human eye which can view about 160˚ by 75˚, while maintaining detail across the entire image. The general way to classify a panoramic camera is by a 2:1 ratio which means that the image has a width 2 times the height. There are two types of panoramic cameras which are the Linhof Technorama 617s III and the Lomographic Horizon Kompakt Rotating Lens 35mm.

Types of Panoramic Cameras:

Linhof Technorama 617s III

The Linhof Technorama 617s III camera has a 3:1 ratio (the image has a width 3 times the height) which can make 4 exposures of 6x17cm images on 120 roll film or 8 exposures of 6x7cm images on 220 roll film. The Technorama has four interchangeable lenses (72mm, 90mm, 180mm, and a Tele-Arton S 250mm) which produce a large format quality. There are also lenses that fix the parallax problem that many cameras have trouble correcting. The Technorama is ideal for shooting architectural, industrial, landscapes, and aerial photographs.

Lomographic Horizon Kompakt Rotating Lens 35m

The Lomographic Horizon Kompakt Rotating Lens 35mm camera has a double-wide angle of view which fills two full 35mm frames. A disadvantage to using a Horizon is that the format for an image is 24x58mm, which requires professional processing which is expensive and inconvenient. A unique feature of the Horizon is the swing lens technology. The camera has a rotating lens which swings from side to side and has a narrow vertical slit between the lens and film that rotates along with it to expose the film as the lens moves. Another good feature about the camera is that the film plane is curved so that the film is tight and the image maintains an equal distance from the lens.


http://www.bhphotovideo.com/

Friday, March 28, 2008

Types of Medium Format Cameras

Twin Lens Reflex Cameras

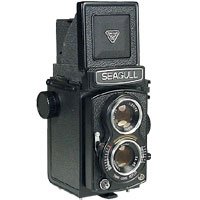
Seagull GC-104

The Seagull GC-104 has a lightweight design which consists of a waist-level finder with a pop-up magnifier, manual film wind advance and separate shutter speed and aperature levers and comes equipped with a built-in 75mm f/3.5 Seagull lens. There are some great features about this camera; for instance, it shoots in a 6x6cm format, the camera is supplied with a 6x4.5cm format mask which fits inside the camera and allows the photographer to obtain 16 exposures from 120 film. Another good camera feature is the mechanical lens shutter is designed to provide a flash synchronization at all speeds up to 1/3000 second and has a bulb exposure as well.

Rolleiflex 4.0 FW


The Rolleiflex 4.0 FW uses a 6x6cm format and has more than 4x the area of a 35mm camera. Instead of using a typical viewfinder, the Rolleiflex uses a ground-glass focusing system which gives a larger format feel when looking through the camera. The Rolleiflex also features a fold-away crank that moves the film with a quick swinging motion, while simultaneously cocking the shutter and advancing the frame counter. There are other features such as film speed adjustment that ranges from 25-6400 ISO, a cable release socket, high performance 50mm f/4.0 wide-angle lens, parallax correction, and interchangeable focusing screens.


Single Lens Reflex Cameras

Hasselblad 503CW

The Hasselblad 503CW has a compact, lightweight design with a built-in flash metering system, and is good for studio or location photography. Some other features of the Hasselblad are they have an acute-matte “D” focusing screen with microprism and split-image rangefinder spot and a gliding mirror system, which works well with longer lenses.


35mm Camera


The Nikon FM2 is just an example of a 35mm camera but there are many other types designed by Canon and Minolta. In particular, the Nikon 35mm cameras, have shutter speeds that range from 1 second to 1/4000 of a second including the bulb exposure as well. A 35mm camera is a good back-up camera because it is compact, light weight, battery powered, and can be taken outside of a studio easily.


http://www.bhphotovideo.com/

Medium Format Cameras

Medium format cameras are not too big and not too small so it makes it easier to take to different locations without carrying a lot of bulky equipment. Medium format cameras use 35mm lenses but can use long lenses and high speed lenses with autofocus and produce exceptional image quality. There are two types of medium format cameras which are the twin lens reflex cameras and the single lens reflex cameras.

Twin Lens Reflex Cameras

One type of Medium Format Camera is called a Twin Lens Reflex Camera which means that there are two lenses, with the same focal length, mounted in the front of the camera body. One lens takes the picture while the other lens is the viewfinder. The viewfinder has a 45 degree mirror, a matte focusing screen at the top of the camera, and a pop-up hood surrounding it. A disadvantage of using a twin lens reflex camera is that the photographer views through one lens but takes the photograph through another; parallax error makes the photograph different from the view on the screen. This error would not be noticeable if the subject is far away but highly noticeable for close-up subjects. This also makes viewing the depth of field in an image very hard. An advantage of using a twin lens reflex camera is they use leaf shutter which decreases the noise during an exposure. Typically these types of cameras uses 120 roll of film with square 6x6 cm images. There are two types of Twin Lens Reflex Cameras such as the Seagull GC-104 and the Rolleiflex 4.0 FW.

Single Lens Reflex Cameras

Another type of Medium Format Camera is called a Single Lens Reflex Camera which means that there is only one lens which allows the photographer to see exactly what will be captured on the film through the lens. Single lens reflex cameras use a pentaprism situated above the optical path through the lens to the film plane for direct viewing. The way the pentaprism works is light is reflected by a movable mirror upwards into it where is reflected several times until it aligns with the viewfinder. Then when the shutter is released the mirror moves out of the way of the light and exposes the film. There are two types of Single Lens Reflex Cameras such as the Hasselblad 503CW and the 35mm style.

Wednesday, March 26, 2008

Types of Large Format Cameras

Toyo Field 45AX Pro Field Camera

The Toyo Field 45AX Pro Field Camera is a type of large format camera that very closely resembles the Toyo-View 45A II 4x5 Field Camera, which is an older model. Field Cameras use bellows instead of using a wooden box. Bellows resemble an accordion in the way that they fold back into themselves. The bellows reduce the bulk of the cameras and make it easier to take the cameras outside of the studio. The Toyo Field 45AX camera is equipped with a standard, reversible 4x5 Graflok back, which was enhanced from the older model to economize on weight and cost. The entire weight of the 45AX is less than 6 lbs., which makes it portable and light weight but rugged because of the metal construction of the body of the camera. Another benefit for using the 45AX is image control. The front part of the camera raises, swings, tilts, and shifts while the back tilts and swings as well. These controls allow for correction of distortion, adjustments of depth of field, and use selective focus to manipulate an image.

Santa Barbara Baltic Birch 4x5 Pinhole Camera

The Santa Barbara Baltic Birch 4x5 Pinhole Camera is another type of large format camera that is basically a light-proof box constructed of different woods. A Pinhole Camera is just as it sounds, a tiny hole about 1/64” or smaller drilled in the front panel. The shutter is small metal plate the swings up and down to begin and end the exposure. It also has a focal length equivalent of 75mm, which is a wide-angle lens format.

Linhof 4x5 Master Technika

The Linhof 4x5 Master Technika is another type of large format camera that is a wide angle specialist with a metal construction and a built-in wide angle focusing track and an enormous bellows range with a revolving graflok back suitable for 4x5” film. The advantages to using the Linhof is it’s good for landscape photography and it has a high image quality. The disadvantages are it’s heavier than most field cameras, there are a lot of accessories, a tripod is necessary, and the reloading process takes a long time and needs a bulky carry-on.


http://www.bhphotovideo.com/

Saturday, February 16, 2008

Large Format Cameras

Large format cameras are sometimes referred to as view cameras or technical cameras. Large format cameras are designed normally for professional-studio photography. Traditionally, large format cameras are designed to take 4x5 inch film which is inserted in darkslide holders individually. These cameras are more old fashion because there is no viewfinder and the picture is focused up on a ground glass screen which is normally located at the rear of the camera using a dark cloth to keep out the bright surrounding light.

The draw backs of large format cameras is they require tripods because they are heavier than most cameras and need to be kept still while photographing. Another drawback is the ground glass viewing which makes the image seem dim and upside down; this can be frustrating when a photographer is use to looking through a viewfinder and seeing exactly what the picture will look like. Another drawback is everything is manual which can be a good thing or a bad thing. It can be good because the photographer can control how the picture will come out and bad because there is more room for errors than with automatic cameras. Some other drawbacks are large format cameras are they tend to be more expensive than other cameras and they need longer focal lengths to get the same angle of view as smaller format cameras and using a large format camera takes patience and time to get the shot because it takes a while to set everything up since there are some many bulky parts that have to be assembled.

The advantages of using large format cameras are they can use interchangeable lenses just as easily as 35 mm cameras can and the camera can change shape. Large format cameras have a back piece that can change the whole shape of the camera so that the back and front are not longer directly in line. The movements allow the camera to adjust sharpness, perspective, and the shape of the subject as seen on the film. Another advantage of the large format camera is the flexible bellows which connect the front of the camera to the back. The bellows help to adjust the range of focal lengths (since there are no zoom lenses in large format cameras), focusing distances, and lateral and angular adjustments between where the film is located and the where the lens is located. Some other advantages of large format cameras, are they take larger image sizes and produce results that are sharper, have a better tonality and are grain-free to make the image look smoother.

Photography

Photography is a large part of our everyday entertainment. Photography has become a hobby in many ways; it provides a means of recording and preserving peoples most memorable experiences but also offers a means of self-expression. The only problem is that many people have become familiar with casual cameras, which are easy to use and fairly inexpensive but requires little thought or design elements. Casual cameras, or “snap shot” cameras, are mainly automatically operated and are just point and shoot operated. However, with manual cameras, the photographer can control how the picture comes out and be proud that they created that photograph. On the other hand, with manual cameras there is more room for error than with automatic cameras, most of the times the results come out to the photographer’s advantage. A photographer’s wonderland is in The Dark Room. In the dark room, a photographer can do pretty much anything to make a negative do what they want. Negatives can be enlarged, cropped, repeated on a single sheet, merged with many other negatives, and burned or dodged to show more or less contrast to effect the outcome of the resulting photograph.

In black and white photography, there are many different types of cameras available. There are large format cameras, simple basic cameras, viewfinder cameras, rangefinder cameras, instant cameras, unusual cameras, twin lens reflex cameras, and single lens reflex cameras. In black and white photography there are many other aspects and equipment that go along with the different types of cameras to produce an image. There are different types of exposure meters, film, lenses, components and selecting of an image, light qualities, as well as the types of images that can be produced such as landscapes and portraits along with many other types. In black and white photography, these different aspects and techniques give the photographer the control they need to produce amazing photographs.